Editing
I will be using Photoshop to draw the frames of the short film, I've chosen this because it's a software I'm used to using and know that it's a very versatile drawing program. It has multiple brush types available, including pencil-like textured ones, which would really help with the style I want to use in the film. Despite it being made digitally, I really want it to have an authentic, home-made feeling.
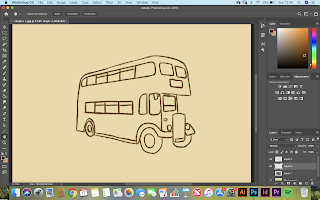

Here are some screenshots of my work in Photoshop. These of the bus show how I did the scenery and props, starting with an outline, generally traced from an image I found from the time to ensure accuracy. I then would go over it with the colours I wanted, I had a set palette of about 4 colours, sometimes deviating from it if I needed one lighter tint or one darker shade, so I would chose from them according to how I wanted the lighting. In this still of the bus I wanted the surroundings to be darker as if it were evening or nighttime, and for the bus and the children to be lit up, partially to bring in the focus and make them stand out from the darker background, and partially to make it look like they were lit by street lights.

 These screenshots show my methods for people and larger scenes, for this evacuee shot I started with the line of the ground, using a ruler against my graphics tablet to get a straight line, and then drew in the reddish-brown colour lines to show where the children would be. I then started drawing the children in the dark brown over these lines. I really wanted to capture different dynamics between the children, adding different poses to make it more realistic than simply standing upright with nothing to do. I imagine plenty of the evacuated children would stand still through overwhelming emotion, but I would think many would be distracting themselves by going through their bags or helping their younger siblings.

 These screenshots show the method for many of my drawn-out scenes, I would begin with a basic outline (as seen above) with the palette in the background layer. This established the layout of the scene and the cinematography, as well as the character expression and movement. I would then go over these outlines in the dark brown with the details of the clothes and faces as seen to the left. Below you can see the beginning of the colouring, I usually drew the background in a bigger brush tool, as it didn't need as much detail. I would then choose the colour of the background, and then colour in the rest.
 This is one of the final frames, showing the positioning of the characters, the shading, and the colouring I made in Photoshop.
 To animate some of the stills I created I made the original layer slightly opaque and then drew over it with slight adjustments to change the positioning of the head of the character, for example, like what is happening in this screenshot here. Below os an editing together animated clip, showing the movement of a head and the movement of a mouth. The movements are simple but convey my method well enough.
To put the clips together I will use Premiere Pro, I know that it's a good editing software and has a lot more to it than other softwares I own like IMovie. It is more complicated because of this but looking up tutorials is easy enough and in the long run it will be worth it for the higher quality outcome.
 This is a screenshot from me editing the rough cut together, I have layered up some of the stills, starting with the silhouette of London, scaled down so it doesn't fill the whole frame, then the small png of a doodlebug/V-1 Rocket, that I would then move, as you can see in the effects control on the left side of the screen. and finally the png of the family looking through the window. I also added a gradual blur to the V-1 Rocket, so that when it turned and fell it blurred like it would in real life, this you can also see in the effects control window on the left.


Here are some screenshots of my work in Photoshop. These of the bus show how I did the scenery and props, starting with an outline, generally traced from an image I found from the time to ensure accuracy. I then would go over it with the colours I wanted, I had a set palette of about 4 colours, sometimes deviating from it if I needed one lighter tint or one darker shade, so I would chose from them according to how I wanted the lighting. In this still of the bus I wanted the surroundings to be darker as if it were evening or nighttime, and for the bus and the children to be lit up, partially to bring in the focus and make them stand out from the darker background, and partially to make it look like they were lit by street lights.

 These screenshots show my methods for people and larger scenes, for this evacuee shot I started with the line of the ground, using a ruler against my graphics tablet to get a straight line, and then drew in the reddish-brown colour lines to show where the children would be. I then started drawing the children in the dark brown over these lines. I really wanted to capture different dynamics between the children, adding different poses to make it more realistic than simply standing upright with nothing to do. I imagine plenty of the evacuated children would stand still through overwhelming emotion, but I would think many would be distracting themselves by going through their bags or helping their younger siblings.
 These screenshots show the method for many of my drawn-out scenes, I would begin with a basic outline (as seen above) with the palette in the background layer. This established the layout of the scene and the cinematography, as well as the character expression and movement. I would then go over these outlines in the dark brown with the details of the clothes and faces as seen to the left. Below you can see the beginning of the colouring, I usually drew the background in a bigger brush tool, as it didn't need as much detail. I would then choose the colour of the background, and then colour in the rest.

To put the clips together I will use Premiere Pro, I know that it's a good editing software and has a lot more to it than other softwares I own like IMovie. It is more complicated because of this but looking up tutorials is easy enough and in the long run it will be worth it for the higher quality outcome.
 This is a screenshot from me editing the rough cut together, I have layered up some of the stills, starting with the silhouette of London, scaled down so it doesn't fill the whole frame, then the small png of a doodlebug/V-1 Rocket, that I would then move, as you can see in the effects control on the left side of the screen. and finally the png of the family looking through the window. I also added a gradual blur to the V-1 Rocket, so that when it turned and fell it blurred like it would in real life, this you can also see in the effects control window on the left.

Comments
Post a Comment